
Your MicroSquirt® controller will need a sensor to measure the load on the engine. This can be:
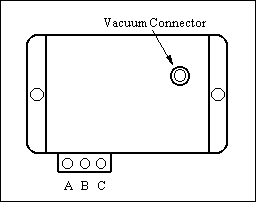
A MAP sensor tells your MicroSquirt® controller the intake vacuum (or boost) the engine has, which uses this to scale the amount of fuel that is injected. MAP sensors generally have three electrical connections: 5 Volts, ground, and a signal. The MAP signal is connected to Amp pin 24. Vref (Amp pin 28) and ground (Amp pin 20) can be shared. In addition to the electrical connections, the MAP sensor also has a vacuum connection the intake manifold - this must be downstream of the throttle(s), in the plenum area.
A separate baro sensor (for full-time barometric pressure sensing, rather than just using the startup value) is connected the same way, but the signal wire is connected to AMP pin 29 via the orange wire with the green stripe. The baro sensor can be the same specification as the MAP sensor, but it can be a different one as well. Vref and ground can be shared.
For the popular GM MAP sensors (which come in 1, 2, and 3 bar versions) the wiring is:

For the popular GM MAP sensors (which come in 1, 2 and 3 bar versions) the wiring is:

and has:
GM MAP sensors are safe to install under the hood, in most cases they are installed directly on the engine in OEM applications.
You need to run vacuum tubing from the MAP sensor to the engine intake manifold. You can use a nipple on the throttle body that has full-time engine vacuum (i.e. NOT ported vacuum). The source you choose should have a high vacuum at idle, if it does not, it is a ported source, and you need to hook your vacuum line somewhere else (either another nipple on the throttle body, or one connected directly to the intake manifold).
Make sure the vacuum tubing you use is appropriate for automotive environments, so that it will not melt, dissolve from oil, etc.
Don't worry about how long your MAP sensor vacuum hose is. Intuitively it seems that shorter should be better. However, a few people have done tests to see how bad the effect of a long hose was on vacuum signal propagation. With a ~100 foot (~30 meters) coil of rubber tubing in between the MegaSquirt® and the engine, the result was that no delay was apparent. This was with about a 10 millisecond resolution clock. The reason for this is that air has so little inertia that it moves at the speed of sound - ~1100 feet per second - in response to a vacuum (this is how we fill the cylinders, after all!).
Note that the default calibration for the MAP sensor in the code is for the MPX4250 that comes with MegaSquirt® main boards. It is not the same as any of the GM MAP sensors. So you must calibrate the sensor.
To calibrate the sensor, you must enter two voltage/pressure points in the 'Tools→Sensor Calibration' dialog in TunerStudioMS. You must do this once each for the engine load MAP sensor and once for the second baro pressure sensor, if you have one.
Also note that this sensor's calibration IS retained in the MSQ when you restore your settings by loading a previous MSQ file. You do not have to recalibrate this sensor when loading a new settings file (MSQ) only when you first setup the controller and whenever you have loaded new code using the bootloader.