
Your MicroSquirt® controller uses an intake air temperature sensor to determine the warm-up characteristics of the engine and the density of the intake air. The coolant temperature sensor must be a Negative Temperature Coefficient (NTC) thermistor. This means that it is a resistor whose resistance decreases as its temperature goes up.
Before electronic fuel injection, the temperature sensors were used mostly to drive gauges or 'idiot lights', rather than control the engine. In addition, these gauges were highly damped, and electrical noise in the signal was not a problem. As a result, many non-EFI vehicles have 'one-wire' temperature sensors, and ground the sensor through the engine block. However, when EFI came along (in the mid 1980s) temperature sensors were used to determine the instantaneous fuelling and spark advance in some cases, and reducing noise became essential. The manufacturer's solution was 'two-wires' sensors that use a dedicated ground return to the ECU (instead of the much more noisy high current ground). MicroSquirt® controllers adopt a similar scheme.
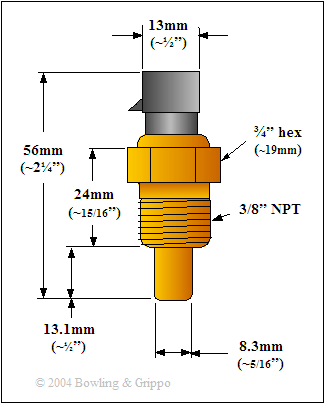
Naturally aspirated engines using MicroSquirt® can use the same sensors for coolant and air temperature. These sensors are inexpensive (roughly $18 US) GM units readily available from any parts store (GM part number 12146312, may have been replaced by #15326386). They have a ¾" hex.
Here are some reported part number equivalents for both the coolant and air temperature sensors (verify before ordering):
Coolant temperature sensor (CLT) | Air temperature sensor (IAT) |
GM #12146312 | GM #25036751 |
Connector Pigtail (CLT)  | Connector Pigtail (IAT)  |
| Wells PN 254 NAPA PN ECHTSC200 Conductite/Dorman 85100 (~$10 @ Autozone (PN 047131)) | Wells PN 235 NAPA PN ECHTSC300 Niehoff PN PS77421 (~$15) Conductite/Dorman PN 85110 (~$12 @ Kragen partsamerica.com) |
The coolant temperature sensors were apparently found in the following applications:
The resistance curves for the MicroSquirt®/General Motors coolant and air temperature sensors, as well as various part number cross-references, are listed below:
Degrees F | Degrees C | Ohms |
-40º | -40 | 100,700 |
0º | -18 | 25,000 |
20º | -7 | 13,500 |
40º | 4 | 7,500 |
70º | 21 | 3,400 |
100º | 38 | 1,800 |
160º | 71 | 450 |
210º | 99 | 185 |
The thread for the recommended General Motors (and equivalent replacement) coolant and air temperature sensors for the MicroSquirt® controller is 3/8 inch National Pipe Taper [NPT] thread. A 9/16 inch pilot hole is required for the tap. Recall that pipe sizes are based on nominal inside diameters, not outside diameters as for standard National Coarse [NC] and National Fine [NF] threads. The sensors are designed to be tightened to 20 N-m (15 lb·ft).

Nominal Pipe Size | Approx. Outside | Drill Size |
1/8" | 3/8" | 5/16" |
1/4" | 1/2" | 7/16" |
3/8" | 5/8" | 9/16" |
These sensors were been used on practically all GM cars in the 1980s and are easy to find - the same is true for the correct connectors. However, other sensors can be used if you use TunerStudioMS to recalibrate your MicroSquirt® EFI controller.
If your are using a sensor from General Motors, you can use the default calibration, and don't need to do any calibration of your sensor.
However, if you are using another type of sensor, you will have to calibrate your MicroSquirt® controller to read it correctly. If you are lucky, you may have one of the sensors already programmed into TunerStudioMS.
If your sensor is not in TunerStudioMS's list, then you will need three temperature/resistance pairs (i.e. the resistance of the sensor at three different temperatures). Ideally these temperatures will span the operating range. You can get these from a factory service manual, or you can measure them yourself, by using ice water for 32°F/0°C, boiling water for 212°F/100°C, and room temperature for a middle point; and measure the resistance of the sensor at each of these temperatures using a digital multi-meter.
Then you need to open TunerStudioMS, and under 'Tools→Calibrate Thermistor Tables' specify the Coolant Temperature Sensor, then either select your sensor or enter the temperature/resistance pairs. In the dialog for calibrating the thermistors, specify 2490 Ohms for the bias resistor value. Then click the 'Write to Controller' button to burn the table. The table will stay in your MicroSquirt® controller's memory until you reburn it, or load new code.
Note that this sensor's calibration is NOT retained in the MSQ when you load new code and restore your settings by loading a previous MSQ file. You must recalibrate this and other sensors.